Installing your SmartLink Aircard is simple. Follow these steps, or simply watch the short video guide below.
How to Guide
Installing Your Aircard
 |
1. Verify the version of SmartLine controller is compatible through the Advanced menu. Only versions 3.1 and higher are compatible.
2. Remove the SmartLink Aircard, accessory bag containing screws, and antenna from the box. On the outside of the box and Aircard is a label with the Aircard 19-digit ID number. You will need this to activate and register your Aircard on the SmartLink Network.
3. Screw the antenna into the Aircard.
4. Run the Aircard cable up through the bottom of the SmartLine controller case. You may need to widen an existing hole using a drill or punch out the area indicated on the bottom.
5. Plug the cable into the RJ-11 phone jack located inside the controller. Ensure it is plugged in completely.
6. Verify all of the cables are out of the way and close the panel door, ensuring it is closed completely.
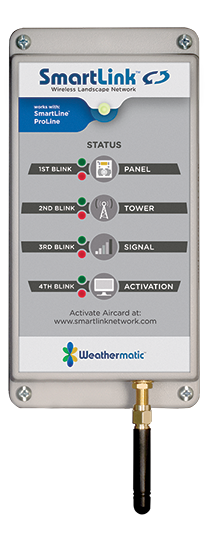
7. The Aircard status will flash rapidly green until it cycles through. This will last approximately 15-30 seconds.
8. Complete the installation by mounting the Aircard using the screws provided in your accessory bag. The antenna should face DOWN.
9. If you have activated the Aircard through the SmartLink Network, the Aircard status will be a solid green light once it establishes communication. If, after activation on the SmartLink Network, the status flashes red, please contact the Help Desk.
10. If you have not yet activated and registered your Aircard, the Aircard status will flash 3 green and then 1 red indicating activation is required. See Step 2 – Getting Started on SmartLink.